Category Archives: How-To
Android update battery problems: How to fix poor battery life following Android 5.0 Lollipop update

Users are reporting battery life issues running the latest Android update. Here’s how to get around the problems
Should I install Android Lollipop?
Well, so much for Lollipop improving battery life. Read the rest of this entry
How to fix Google Play errors
Google Play will provide a pop-up error message when there is an issue installing or updating your apps. Unfortunately, the error message text is very brief and doesn’t explain how you can fix it. For example, error 921:
“Unknown error code during application install (921).” Read the rest of this entry
Best Practices for a higher battery life
The biggest problem using a smartphone is battery life. With smartphones having bigger and better screens now, battery consumption has equally increased. Many smartphones out there have low battery life and requires charging every now and then. But there are some practices you can follow, for your smartphone to have a longer battery life.
Irrespective of what phone you use, whether you’re expecting regular longevity or lifetime longevity of your phone’s battery, these practices will definitely help you out.
Brightness
Yes, turning your brightness higher does hurt your phones battery life. Turning on auto brightness affects your battery life too. Many phones offer auto brightness feature that allows brightness to automatically change to adjust with the surrounding. In most cases, it takes more battery life.
How much it affects battery life is hard to tell. But according to an article published by lifehacker, if you’re a power user, keeping a low brightness will save you almost 2 hours of battery life. However, if you’re not an avid user, it won’t make much of a difference.
But using your phone on low brightness, will not only save you battery life, but will also be good for your eyes. Often, too much brightness, specially in low light, affects your eyesight. So, in both ways, it’s a good practice to lower the brightness of your phone.
Turning off wifi when not in use
Unless you really need it, keeping your wifi off is a good idea. It will save you a good amount of your phone’s battery, or even on laptops and tablets. If you have the “automatically search & connect to networks” feature turned on, it may take up more battery.
So only turn on wifi when you need it. Otherwise, it is highly advisable to keep it turned off. Also, turning on other similar features such as location tracking and 3G/Data Roaming will use more battery. Turning them off is a good idea unless you need them.
Turn off vibration
Phone vibration definitely requires battery usage. And if you’re the kind of person that gets a lot of calls everyday, vibrations will really affect the battery life of you’re phone. Sometimes, vibrations are very important and some people only keep vibration on, which is also a good practice. Turning your ringtone off instead of vibration will save you some battery. But then again, unless you’re someone who gets a lot of calls, it won’t make much difference.
Phone notifications
Although phone notifications that give you email alert or likewise are important, if you’re running low on battery, it’s a good idea to turn them off. Also, it is advisable to turn off unnecessary notifications. This will definitely help you save battery life.
Phone temperature
It is a good practice to keep your phone cool unless the weather is too hot. Keeping your phone in a cool environment is a good way to keep your phone cool and will also give your phone’s battery a longer lifetime. Similarly, if the phones battery gets hot, it will affect it’s lifetime longevity.
Frequent charging
Although people are advised to charge their phone’s battery after it has drained to a low amount, it is not true for all batteries out there. New generation phones with lithium ion batteries can be charged frequently and it is seen that it doesn’t affect the battery life of the phone.
Change your battery
If your phone has been used for a long time, it is advisable to change your phone’s battery for better performance.
These are some of the common tips and practices for a better battery usage. However, other methods may be applied depending on the device. These practices will definitely help you to have a longer battery lifespan.
20 iPhone tips you’ll wish you knew all along
1. Close three apps at once
Need to force-close multiple apps fast? At the risk of looking like you’re clawing at your phone, you can close up to three apps at once by swiping up with three fingers.
2. Quickly shut off the flashlight
Included in iOS’s Control Center is access to a flashlight. Once enabled, you can quickly shut it off by using the camera shortcut from the lock screen.
3. Hidden bubble level
Leave your lime-green bubble level in the drawer. iOS’s built-in leveling tool uses the phone’s gyroscope to help you find out if an object is perfectly horizontal (or vertical).
To access it, launch the compass, then swipe right to reveal the level.
4. Use bold, italics, and underlining
In some apps like Mail, you can use rich formatting to make text bold, italics, or underlined. But if you don’t know it exists, you might miss it.
Just highlight the text you want to edit, and tap the arrow in the copy/paste pop-up. Then, choose “B I U” to access the formatting options.
5. Quickly ‘go back’
Unlike Android, the iPhone doesn’t have a dedicated “back” button. But, a little-known gesture makes that completely acceptable.
In Messages, Mail, and even Safari, simply swipe right from the edge of the screen to go to the previous window. The gesture even works in some third-party apps like Instagram.
6. 10 earbud controls
The stock earbuds are full of hidden talents. With them, you can snap a photo, ignore calls, and more. There are 10 shortcuts in total, and they’re all outlined right here.
- If you’re listening to music, toggle pause or play by tapping the center button once.
- To fast-forward a song, tap the center button twice and long-press on the second tap.
- To rewind a song, tap three times and long-press on the third tap.
- To skip a song, double tap.
- To go to the previous song, triple tap.
- If you have an incoming call, tap the center button once to answer. Tap again to hang up.
- To ignore an incoming call, long-press the center button. You’ll hear two beeps to confirm that the caller was sent to voice mail.
- If you’re on the phone and you get a new call, tap the center button once to switch calls. To end that new call, hold the center button down for 2 seconds.
- You can achieve supersteady shots by using your headphones as a shutter release. Tap the volume-up button to capture a photo.
- For iPhone 4S owners: prompt Siri by long-pressing the center button.
7. Create custom vibration alerts
Want to know if your best friend is calling without ever looking at the phone? Buried in the contact settings, a fun option lets you create custom vibration patterns for your contacts.
To do it, go to Contacts, choose a contact, and tap Edit in the upper-right corner.
Then, scroll down and navigate to Vibration > Create New Vibration. In the interactive screen, tap and hold to create a pattern, using long presses for long vibration notes, and so on.
8. Lock focus and exposure
When the camera is active, tapping the screen sets the focus and exposure for that object. But, the moment the camera moves, these settings are lost.
To lock the focus and exposure, tap and hold until you see a yellow bar appear at the top of the screen, Even if you change your composition, the focus and exposure will be unaffected.
9. Be more frugal with data
If you’re watching your data usage, it’s a good idea to use a feature introduced in iOS 7: cellular data management.
With this tool, you can decide which apps get to use cellular data, and which apps can load only over Wi-Fi.
Head over to Settings > Cellular to disable cellular data usage for any installed apps.
10. Find out what the locals use
When you’re traveling, it’s a good idea to find out which apps the locals love most — especially public transportation apps.
To see what locals are downloading, go to the App Store and tap Near Me at the bottom.
11. Search text messages
Here’s another one you might only stumble upon. To find a specific text message, use the search bar at the top of the message interface.
Don’t see it? Pull down to reveal it, or tap the top bar.
12. Use iMessage overseas
When you’re connected to in-flight Wi-Fi or traveling without a data plan, you can still send text messages to iPhone-using friends.
Just head to Settings > Messages and make sure Send as SMS is disabled, and that iMessage is enabled.
13. Long-press for more characters
Hidden beneath the unassuming characters of the iOS keyboard is a world of letters and symbols only available with a long-press.
For example long-pressing the dash key reveals em and en dashes, while long-pressing the numeral 0 lets you insert a degree symbol.
14. Reveal timestamps
To see when a message was sent, drag the message screen to the left, and the timestamps will be revealed.
15. Siri’s hidden features
Siri can handle really complex commands. She can even do things like set your alarm, and learn how to properly pronounce names.
16. Charge your phone much faster
Sometimes you need to charge your phone fast. The fastest way to do that? Airplane mode.
With all sending and receiving of data cut off, your phone will charge much faster. Just be sure to leave the backlight off, too.
17. Shoot in burst mode
Thanks to the iPhone 5S’s fast processor, the camera now lets you shoot in burst mode, snapping multiple photos per second.
It’s great for capturing sports, kids, and special moments you want every bit of.
18. Increase battery life
Spotlight is really useful for quickly surfacing data on your phone. In order to do that, however, the tool needs to constantly survey your phone for new data and index it.
To temper the effects on your battery, go to Settings > General >Spotlight and uncheck the items you don’t necessarily need indexed.
19. Protect your privacy
This tip will save your battery life and your privacy. Far, far into iOS’s privacy settings is a setting that, when enabled, sends Apple your location data.
Some people don’t care. If you do — and you want a battery boost while you’re at it — disable the feature. Go to Settings > Privacy > System Services to toggle the option.
20. Faster Touch ID recognition
Touch ID seems to have a beef with certain fingers, consistently requiring multiple scans before unlocking the device.
If this sounds familiar, try this: Go to Settings > Touch ID & Passcode. Here, enroll the same finger two to three times by choosing Add a fingerprint.
Doing so will give Touch ID more information about your finger patterns, resulting in a faster scan.
Reduce the time it takes to charge your device [How To]
This quick and simple tip will help you charge your Android, BlackBerry, iOS, or Windows Phone device faster.
We have all been there, it’s 9 p.m. and you’re suppose to meet a friend in a half hour. To make matters even worse, the battery on your smartphone is in the red. Surely you don’t have enough time to charge your device without being late? Wrong.
Before you connect your phone to the charger, close any open apps and enable Airplane mode. This will turn off all of the wireless radios in your device, preventing you from making calls, accessing the Web, or using the GPS. The trade-off? Your device will be able to charge slightly faster because background processes will no longer be eating away at your phone’s battery.
The same charging benefits can also be achieved by powering the phone completely down, although this isn’t an ideal solution for those of us who rely on the clock or alarm features. While charging times won’t be earth-shattering (improving by only a few minutes), every second counts when you are in a rush. It should be noted that charging times will vary depending on the size of your battery and how powerful the charger you are using.
Remember, the backlight and display require a significant amount of power. There’s no need to keep checking the charging progress of your device. Let your phone charge and grab it when you are ready to leave.
What Should I Do With My Phone Before I Sell It?
If you’re passing on an old Android handset to someone else, you may want to go further than using the default data wipe tools. According to a new report, they don’t effectively remove all of your personal data.
In a small study, security company Avast purchased 20 Android smartphones from eBay which had been supposedly cleared of personal data. But they managed to recover over 40,000 photos (including 250 nude selfies), 750 emails and text messages, 250 contacts, the identities of four phones’ previous owners, and one completed loan application. Eep.
The problem is that the default data wipe tools only cleans phones “at the application layer” — which means that data can still be recovered using drive-imaging programs (like Forensic Toolkit, which is free to download). Instead, anyone choosing to pass on their phone should completely wipe their handset. The best way to do that?
What Should I Do With My Phone Before I Sell It?
It’s surprising how many people sell their phones without doing anything to remove private data. Selling your phone to a stranger as-is gives that stranger access all your music, email, text messages and other data for a few hundred dollars. To make sure your private data’s safe, you’ll want to do a full wipe of your phone before you sell it off. This is actually very easy to do, on both the iPhone or Android. Here’s how:
How to Wipe an iPhone
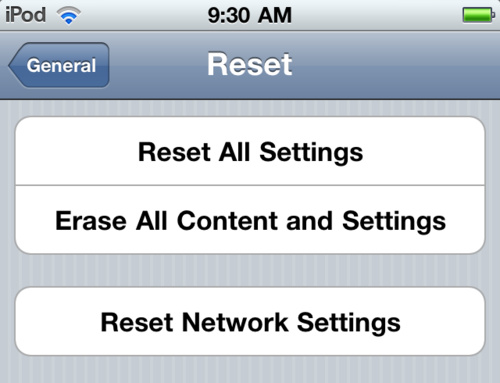
Wiping the iPhone is incredibly simple. Just head into the Settings app on your phone, go to the General section, and scroll all the way down to the bottom of the menu. You should see a button that says “Reset”. Tap that and hit the “Erase All Content and Settings” button. This will do a full wipe of all your media, settings and other data, so your phone is just like it was out of the box for your new buyer.
For what it’s worth, you can also plug it into iTunes and hit the “Restore” button. This is nice if you want to make one last backup before you wipe, since you’ll have to be in iTunes anyway. Either method should work fine. Note that both methods will also un-jailbreak your phone, if it was jailbroken.
How to Wipe an Android Phone
Android phones are easy to wipe, but require a few more button taps. Unlike the iPhone, your Android phone has multiple hard drives inside it. It has its internal memory, where most of your apps and system settings are stored, and your SD card, where your music, pictures, and some app settings are stored. Some phones, like the Droid Incredible, even have two SD cards. So, when wiping, you want to make sure you get everything.
If your SD card came with your phone, I’d recommend wiping it and selling it with the phone. If you bought your SD card separately, though, you might as well keep it for yourself and use it on your next phone (unless you want to sell it with your phone and bring up the price a bit). If you’re keeping it, you don’t need to wipe it. However, if your phone did come with an SD card, whether it’s the one you’re using right now or not, it’s a good idea to pop it in, wipe it, and sell it with the phone.
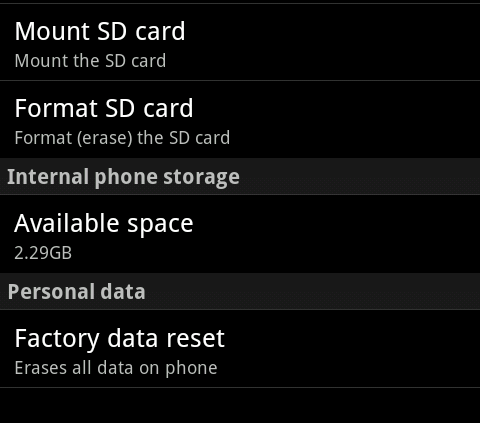
To wipe your phone, head into Settings > SD & Phone Storage. First, hit the “Unmount SD Card” option. When it finishes unmounting the card, you’ll see the “Format SD Card” button will no longer be greyed out. Click on that to wipe your SD card. When that’s done, hit the “Factory Data Reset” button. This will erase all your other data, and return your phone to what it was like when you bought it. If you have a Droid Incredible or other two-SD-card phone, you should have a third option to wipe that internal storage, which you’ll also want to do.
Note that if you have a rooted phone, this process will not remove root, and it won’t remove any custom ROMs you’re running. To do that, you’ll need to use a program like Motorola’s RSD Lite (if you have a Motorola phone) to fully wipe your phone. You may need a different program depending on your manufacturer. That said, you could also sell your phone as rooted — some people prefer to buy their phone pre-rooted, and there are online sellers that support selling rooted and ROMed phones.
That’s it! It’s very simple to prepare your phone for sale, and you don’t need to do that much to keep your data safe. Enjoy your new phone!
How to Install iOS 8’s New Notification Center on iPads & iPhones Running iOS 7
 Unless you are or know a developer, you’ll have to wait until sometime in September for the official iOS 8 to hit your iPad or iPhone. However, that doesn’t mean you can’t get some of iOS 8’s new features on your iOS 7 device right now. For example, the new Notification Center, which I’ll show you how to install below.
Step 1: Jailbreak iOS 7.1.X
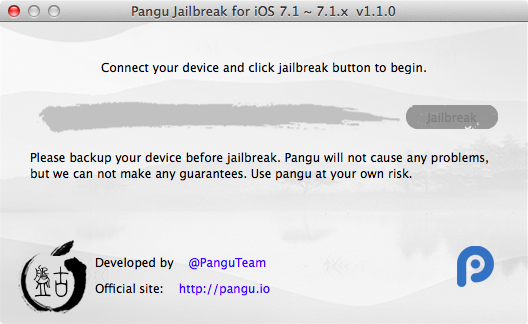
For this to work, you’ll need to follow our guide on jailbreaking iOS 7.1, 7.1.1, or 7.1.2 on your iPad, iPhone, or iPod Touch. It’s as simple as connecting your phone to a computer and clicking a single button. Seriously, it takes less than two minutes if you’ve got fast internet. 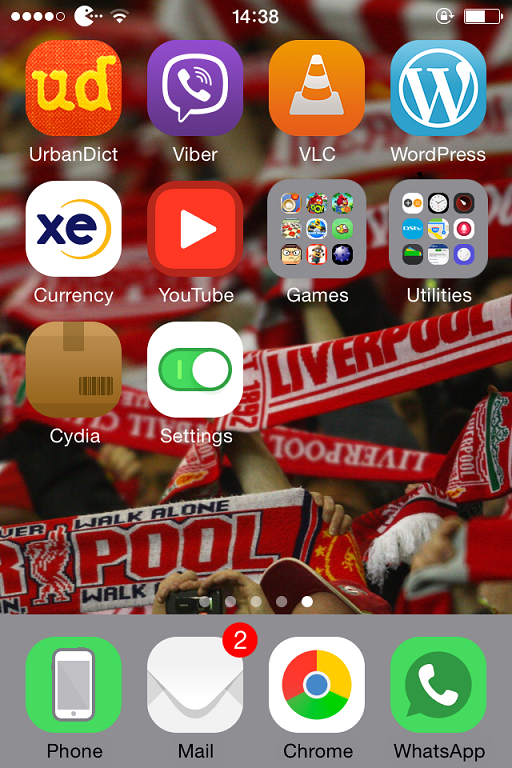
Step 2: Install Notific8 in Cydia
Once you’re jailbroken, open Cydia (the official app store for jailbroken devices) and Search for Notific8. Once you find it, tap on Notific8, then Install and Confirm. 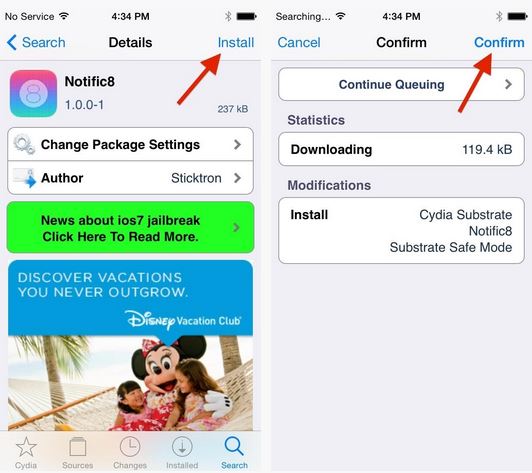 The download will start and the app will run. After which, select Restart Springboard for the effects to take place.
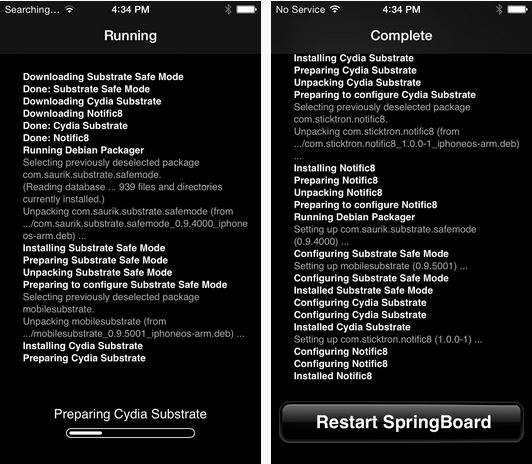
New Notification Center
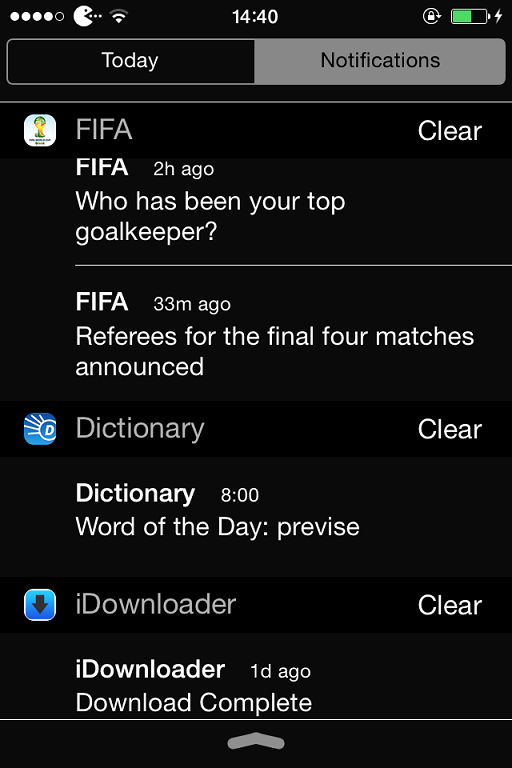
So what’s different? For starters, the All and Missed tabs are now combined into a single tab called Notifications.  Additionally, the gaussian blur is more transparent, widget and notification titles now have a background bar (a bit glitchy), and a new edit button exists at the bottom, which grants you quick access to your Notification Center settings (in iOS 8, it allows you to manage widgets). Developer Stricktron is looking to not only make improvements in the future, but also to add any changes made to iOS 8’s Notification Center as the beta builds progress.
Removing Notific8
To remove Notific8 and revert back to your old Notification Center, go back to Cydia, tap on Installed, select Notific8, and tap Modify -> Confirm ->Remove. 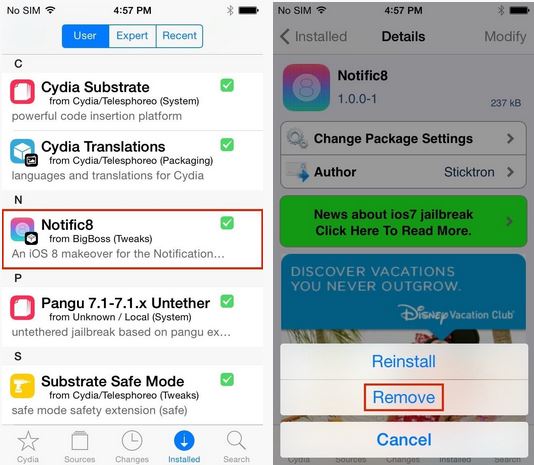 Then simply Restart Springboard so it’s completely removed.
How To Stop Facebook From Sharing Your Browsing History
Earlier today, Facebook announced that it was going to start using all of that ever-so-illuminating app and website data it collects to serve us with more targeted ads. In other words, Facebook is getting ready to use your browsing history to benefit advertisers. Here’s how to stop them.
Of course, just because you’re getting some new (and highly necessary) controls over how Facebook shares your data doesn’t mean it’s going to stop collecting the data in the first place. So while we can at least somewhat limit how all of our salacious internet habits are being used, it doesn’t mean the cache of data itself is going away.
What’s more, the new feature is opt-out, so in order to keep your browsing history away from prying third-party eyes. You’ll need to actively head over to the Digital Advertising Alliance here and let them know you’re not willing to share.
Note: if you’re using AdBlocker Plus or anything else that disables cookies, you’re going to need to turn that off before you’ll be able to opt out.
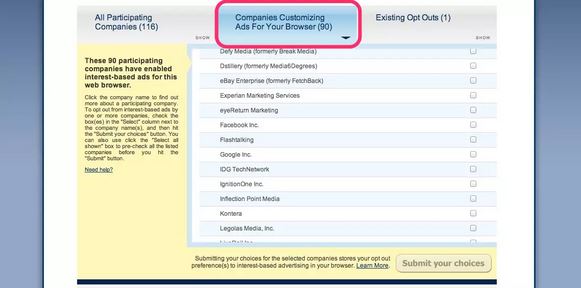
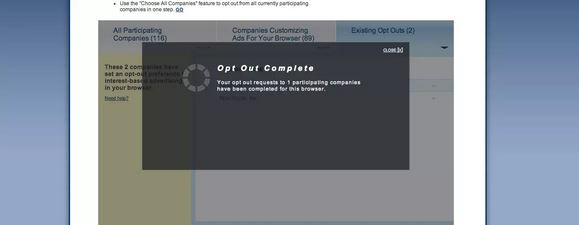
Once there, you’ll see the above screen. Select the “Companies Customising Ads for Your Browser” tab, and scroll down until you see Facebook.
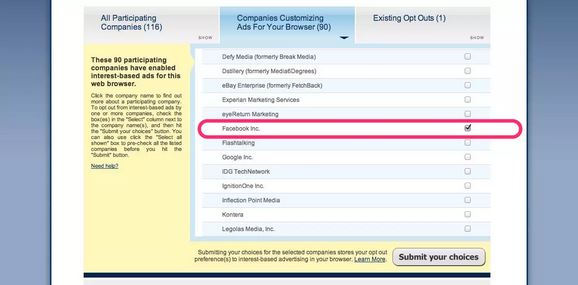
Click the little check box next to Facebook, and as long as you’re here, feel free to scroll through and check off any other sites you’d like to stop forking over your most private internet deeds. Once you’ve clicked to your heart’s content, hit “Submit”.
Now, considering how many of us also use the Facebook app, you’re probably going to want to do the same for your mobile device(s). For iOS users, open settings and go to General>Restrictions>Advertising (under the “Privacy” section). Flip the switch for Limit Ad Tracking, and you’re all set.
New Google Now Alarms Wake You Up For Correct Stops During Public Transport + How to Get Google Now on iPhone, and 8 Tips for Setup
Google has solved our dreary problems with a new feature that they have integrated within Google Now. Google Now puts customized information before your very eyes, from updated tracking info for package deliveries to sports recaps.
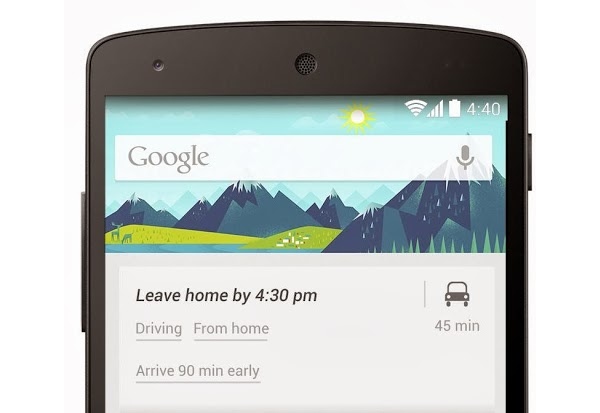
Now when you are using public transportation, you can open Google Now and you will be given the option to set an alarm for saved locations like Home and Work. The alarm knows approximately when and where to let you off so you don’t miss your stop. All you have to do is just tap the alarm when you are on the bus or train and it will be ready for when you take that little nap that is hard to come over. The alarm alerts you before you reach your destination so you can be aware of where you are and have time to get off the bus before it closes its doors again. The newly integrated feature is nifty. One thing to keep in mind is that this feature is not part of the Clock app that is on your device The alarm is only in Google now and shows up when you use public transportation. Its easy to use, just tap it once to set the alarm and tap it again to disable it.
How to Get Google Now on iPhone:
Here’s how to get Google Now on iOS devices and tips for customizing it.
Maybe you’ve heard that you can get Google Now on iPhone and iPad. Google Now is a service that’s part of Google that delivers personalized information, such as directions to an upcoming appointment in your Google Calendar, traffic alerts before you leave, and even sports scores and game summaries from your favorite teams.
But do you want Google Now? The answer is a resounding yes—unless you’re very concerned about privacy and worried about what Google will do with your information, which is an ongoing debate with nearly every Google product.
Google Now has a ton to offer mobile users. Here’s a quick primer on how to get Google Now for iPhone or iPad, and some tips for setting it up to get the most out of it.
Google Now is not its own app. It’s actually a feature/service inside the Google Search app. If you already have the Google Search app installed on your iPhone, iPod touch, or iPad, just be sure to update it. New users will have to sign in with their Google account.
When you launch the app for the first time, or after installing the most recent update, you’ll see a welcome video explaining the very basics of Google Now.
Tips for Setting Up Google Now:
After playing the short video, the app will walk you through a brief tutorial that shows how “cards” in Google Now display at the bottom of your screen when something relevant occurs.
One of the tricks in setting up is figuring out which cards you want. By default, practically everything is turned on, so you’ll want to toggle off information you don’t want, too.
1. Explore the settings. The settings look pretty drab at first glance. That’s because you have to go to Settings > Google Now to see the complete list of options.
2. Enter Home and Work addresses. Likely, one of the features you’ll want to use from Google Now is traffic updates and directions, especially for a daily commute between work and home. But first, you’ll need to mark your work and home addresses. To set these locations, go to
Settings > Traffic > and look for Locations, where you’ll find Home and Work.
Type in the street addresses.
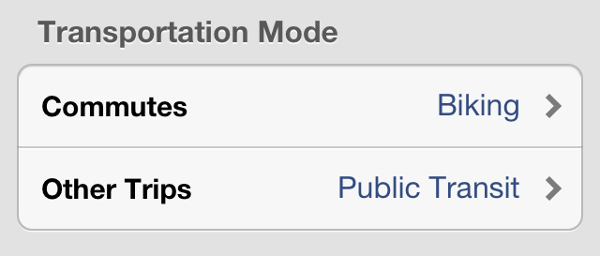
3. Set your commute type. Another setting most people will definitely want to customize is commute type to get the most accurate and relevant traffic alerts before you leave your home or office. This setting is also found in the Traffic area. Look under Transportation Mode, and choose Commutes.
You can select driving, public transit, walking, or biking as your default mode of transportation for your commute.
4. Enter your non-commuting mode of transportation. One more crucial item to set in the Traffic area is your non-commuting mode of transportation if it differs from your commute style. If you typically take a train to work but drive everywhere else, you’ll definitely want to adjust this setting.
5. Add sports teams. There is a way to get sports updates, such as latest scores and game recaps, in Google Now, but you have to customize the feature in order for it to work (otherwise, it’s technically on, but remains dormant).
Go to Settings > Google Now > Sports > Teams and search for the team name.
You’ll find loads of international soccer/football teams, but nothing in the way of cricket. (I know it’s one of the most popular sports in the world. That’s why I’m mentioning it.) Not a sports fan? Just turn off the setting or simply don’t add any teams and you won’t be bothered.
6. Add stocks. Another one of the few features that is turned on but remains dormant until you configure it is stock updates. Go to Settings > Google Now > Stocks and enable the information you want to see. Choose Always to see up-to-the-moment stock updates, or Morning and Evenings or When Relevant to see fewer updates. Beneath those choices, click Stocks to add individual stocks to watch.
For some unknown reason, there isn’t an editing button to change the order of stocks after you add them (they fall in reverse-chronological order of when you added them). It’s something of a moot point, though because after I set up some stocks, they didn’t appear on my alert cards in the same order that I set them in the settings anyhow.
7. Turn off extraneous settings. A few of the settings that were on by default didn’t suit my needs, so I shut them off. You may want to as well to keep the flow of incoming information relevant and manageable. One example of a setting I turned off is the Movies feature, which pushes cinema times at you when you’re near a theater. I also changed my News Updates “Interest Level” to low, among the choices low, medium, or high.
8. Use your Gmail address for shopping and reservations. By default, Google Now scans your Gmail for flight and hotel itineraries, package tracking information, restaurant reservations, and other upcoming events—which means you have to use your Gmail address when booking in order for these items to appear in Google Now.

